Building a OS from Scratch(Day 1: Hello World )
So Lets Start The build For the OS but before it we need to know about the tools we need to use in it .
You can Also read it on my notion page: https://adarshkrdubay.notion.site/Day-1-Hello-World-195447bdb05380b7bef7c52973f8a50e
Tools
Text Editor (I am using nano)
make NASM (assembler )
qemu (Virtual Software)
System
I am using a Windows 11 machine with WSL enabled in it .
Step 1 (Making of dir and files )
To Start it we need to create some files and folder in which all the codes will saved
itswiz@TheWiz:~/TWZ$ mkdir src
itswiz@TheWiz:~/TWZ$ cd src/
itswiz@TheWiz:~/TWZ/src$ nano main.asm
We need to start with assembly first to write the basic bootloader and after that we will switch to c for more codes
Basic to Assembly language
Assembly language is a low-level programming language that allows programmers to communicate with a computer’s hardware. It’s designed to be readable by humans, unlike machine language, which is made up of binary and hexadecimal characters In this case we will use assemblyX86 for the code
How a computer Starts up?
- BIOS is copied from a ROM chip into RAM
- BIOS starts executing code
. initializes hardware
. run some tests (POST = power-on self test) - BIOS searches for an operating system to start
- BIOS loads and starts the operating system
- Operating system runs
How BIOS find the OS ?
- Lagacy booting
- BIOS loads first sector of each bootable device into memory ( at location 0x7C00 )
- BIOS checks for 0xAA55 signature
- If found , it start executing codes
- EFI
.BIOS looks into EFI partitions
.bla bla (We are doing it in Lagacy booting so fuck EFI)
Step 2 Let’s code basic
We know that BIOS always puts our OS at address 0x7C00 so first we need to give this info with the help of org dir
org 0x7C00orgstands for origin, and0x7C00specifies that the program should be loaded at memory address0x7C00- This is because when the BIOS loads a boot sector from a bootable device, it places it in memory at 0x7C00.
- Setting
org 0x7C00ensures that all labels and memory references are calculated correctly.
org 0x7C00
bits 16- This tells the assembler that we are writing 16-bit code.
- The CPU starts in real mode after booting, where it operates in 16-bit mode.
main Function
main:
	hlt
.halt:
jmp .halthlt(Halt CPU Instruction)hltis a CPU instruction that stops execution and puts the processor into a low-power state.- The CPU remains halted until an interrupt (e.g., a key press, hardware signal) wakes it up.
.halt:Label- This label marks a section of code that contains an infinite loop.
jmp .halt(Infinite Loop)jmp .haltis an unconditional jump that repeatedly jumps to.halt.- This ensures the program does not continue executing random memory (which could crash the system).
Why Use This?
- If
hltis executed, the CPU will stop. - However, if an interrupt occurs and wakes the CPU up, execution continues.
- The
jmp .haltensures that if the CPU wakes up, it does not execute unintended instructions.
Padding & Boot Signature
times 510-($-$$) db 0
dw 0xAA55
times 510-($-$$) db 0- Fills the rest of the 512-byte boot sector with zeros.
$represents the current position in the file.$$is the beginning of the file.(510 - ($ - $$))calculates how many zero bytes are needed.dw 0xAA55- Boot signature (
0xAA55) must be present at the last two bytes. - The BIOS checks this signature to determine if the disk is bootable.
Full basic code just to stop the processes
org 0x7C00
bits 16
main:
	hlt
.halt:
	jmp .halt
times 510-($-$$) db 0
dw 0xAA55
Building the OS (Just for test )
Compiling the Bootloader
nasm src/main.asm -f bin -o build/main.binUsing NASM to compile the Assembly file
Creating a Bootable Floppy Image
dd if=/dev/zero of=build/floppy.img bs=1024 count=1440
dd if=build/main.bin of=build/floppy.img conv=notrunc
Testing with QEMU
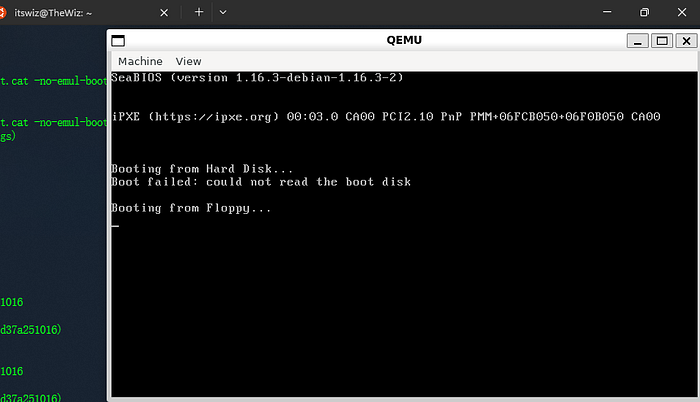
Run the OS in QEMU:
qemu-system-i386 -fda build/main_floppy.imgAnd its runs
Step 3 Let’s code Hello world or Writing Our First Bootloader
Before that we need to know x86 CPU Registers. The registers are like variables built in the processor. Using registers instead of memory to store values makes the process faster and cleaner. The problem with the x86 serie of processors is that there are few registers to use. This section describes the main use of each register and ways to use them. That in note that the rules described here are more suggestions than strict rules. Some operations need absolutely some kind of registers but most of the you can use any of the freely.
basic types :
- General registers general register are the one we use most of the time Most of the instructions perform on these registers. They all can be broken down into 16 and 8 bit registers.
- Segment registers Segment registers hold the segment address of various items. They are only available in 16 values. They can only be set by a general register or special instructions. Some of them are critical for the good execution of the program and you might want to consider playing with them when you’ll be ready for multi-segment programming
- Indexes and pointers Indexes and pointer and the offset part of and address. They have various uses but each register has a specific function. They some time used with a segment register to point to far address (in a 1Mb range). The register with an “E” prefix can only be used in protected mode.
- The EFLAGS register The EFLAGS register hold the state of the processor. It is modified by many intructions and is used for comparing some parameters, conditional loops and conditionnal jumps. Each bit holds the state of specific parameter of the last instruction.
You can get more info from https://www.eecg.utoronto.ca/~amza/www.mindsec.com/files/x86regs.html
Basic Bootloader Code (src/main.asm)
org 0x7C00          ; Bootloader starts at memory address 0x7C00
bits 16             ; We are in real mode (16-bit)
start:
jmp main ; Jump to the main code; Function to print a string
puts:
push si ; Save SI register
push ax ; Save AX register.loop:
lodsb ; Load next character from SI into AL
or al, al ; Check if AL == 0 (end of string)
jz .done ; If zero, stop printing mov ah, 0x0E ; BIOS interrupt: Print character
mov bh, 0 ; Page number
int 0x10 ; Call BIOS interrupt
jmp .loop ; Repeat.done:
pop ax ; Restore AX register
pop si ; Restore SI register
ret ; Returnmain:
xor ax, ax ; Set AX = 0
mov ds, ax ; Set Data Segment to 0
mov es, ax ; Set Extra Segment to 0
mov ss, ax ; Set Stack Segment to 0
mov sp, 0x7C00 ; Set Stack Pointer mov si, msg_hello ; Load address of message
call puts ; Call print function hlt ; Halt CPU
.halt:
jmp .halt ; Infinite loopmsg_hello: db 'Hello, OS World!', 0x0D, 0x0A, 0 ; Message stringtimes 510-($-$$) db 0 ; Fill with zeros to make 512 bytes
dw 0xAA55 ; Boot signature (must be at the end)
Building the OS again
Compiling the Bootloader
nasm src/main.asm -f bin -o build/main.binUsing NASM to compile the Assembly file
Creating a Bootable Floppy Image
dd if=/dev/zero of=build/floppy.img bs=1024 count=1440
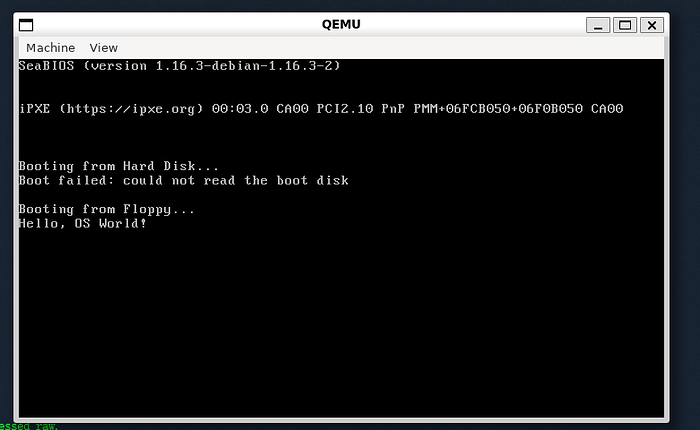
dd if=build/main.bin of=build/floppy.img conv=notruncTesting with QEMU
Run the OS in QEMU:
qemu-system-i386 -fda build/main_floppy.imgAnd its runs again.
Conclusion
In this initial exploration of OS development, we’ve covered several fundamental concepts:
- Successfully set up a basic development environment with essential tools like NASM, QEMU, and required command-line utilities
- Learned about the basics of assembly language and its role in bootloader development
- Understood key concepts like memory addressing (0x7C00), CPU modes (16-bit real mode), and the boot signature
- Created a working bootloader that can display text using BIOS interrupts
This foundation will serve as a stepping stone for more advanced OS development concepts like memory management, interrupt handling, and eventually transitioning to higher-level languages like C for more complex functionality.
Upcoming Features:
- Building a Kernel
- Implementing File System Support
Follow me: Adarsh Kumar
